


Want to save time and automate repetitive tasks? RingCentral's Workflow Builder is a powerful tool designed to do just that. While it offers a variety of pre-built templates and recipes for common uses, this quick start guide will empower you to create and edit any workflow you need by understanding its key components.
Understanding the Building Blocks
Before we start building workflows, let’s talk a little about the main components that you’ll encounter throughout your building experience.
Triggers
A trigger is the event that starts your workflow. Think of it as the “when” part of a statement. For example, when a new chat message is received, workflow will send a message. Here are the triggers that you can choose from:
- SMS received: trigger when a new SMS/text message is received SMS received: trigger when a new SMS/text message is received
- Chat message received: triggers when a new team messaging is received
- Call received: triggers when a call is received
- Call ended: triggers when a call is ended
- Scheduled: trigger based on a predefined time or recurring schedule
- Call missed: triggers when a call is missed
- Voicemail received: triggers when a new voicemail is received
- Fax received: triggers when a fax is received
- Fax sent: triggers when a fax is send
Trigger Conditions
Attached to the trigger, these conditions define the specific criteria that must be met for the workflow to continue. This narrows down your trigger. For example, if the message is from a specific person, or if it mentions your name. You can set variables to set the criteria of your conditions:
| Team ID | Message creator ID | My presence status | My Email |
| Team URL | Message created name | My account ID | My extension number |
| Message Text | Message received date | My extension ID | |
| Chat Type | Message received time | My first name | |
| Mention me? | Message received day of week | My last name |
Actions
An action is a task (or series of tasks) the workflow performs once the conditions are met. This is the "then" part of the statement. For example, “when you receive a chat message and if you are mentioned, then a) send a chat message, b) create a meeting, and c) send an SMS.” You can choose from the following actions:
- Send SMS
- Send chat message
- Make a RingOut call
- Create a meeting
- Lookup contact
- Create personal contact
- Update personal contact
Getting Started with Workflows
Now that we’ve talked about the three main components of a workflow, let’s create a simple workflow to get you started.
- Open your RingCentral desktop or web app.
- Look for the Workflows icon on the left-hand panel.
- If you don't see it, click the More button (three dots) at the bottom of the panel, then select Customize tabs to add it for easy access.
Once you’ve found the Workflows dashboard, click Create workflow to begin. Let’s create an automated response, if someone directly messaged you in the RingCentral app
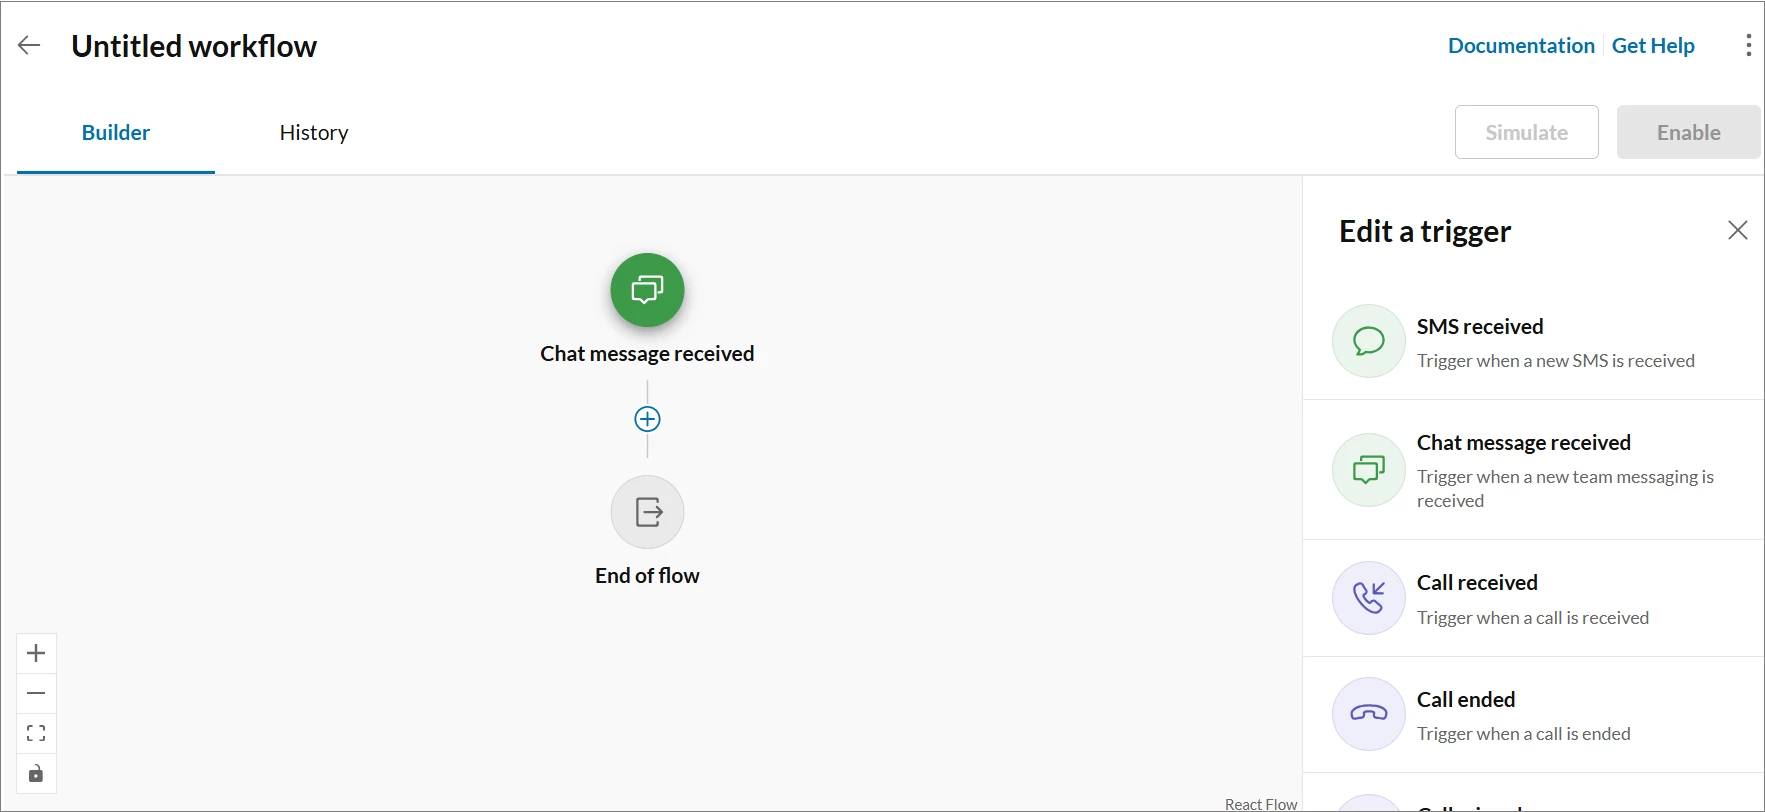
- Choose a trigger. For our scenario our trigger would be a Chat message received.
- Click Add a trigger.
- Select Chat message received. This tells the workflow to check for any new chat messages
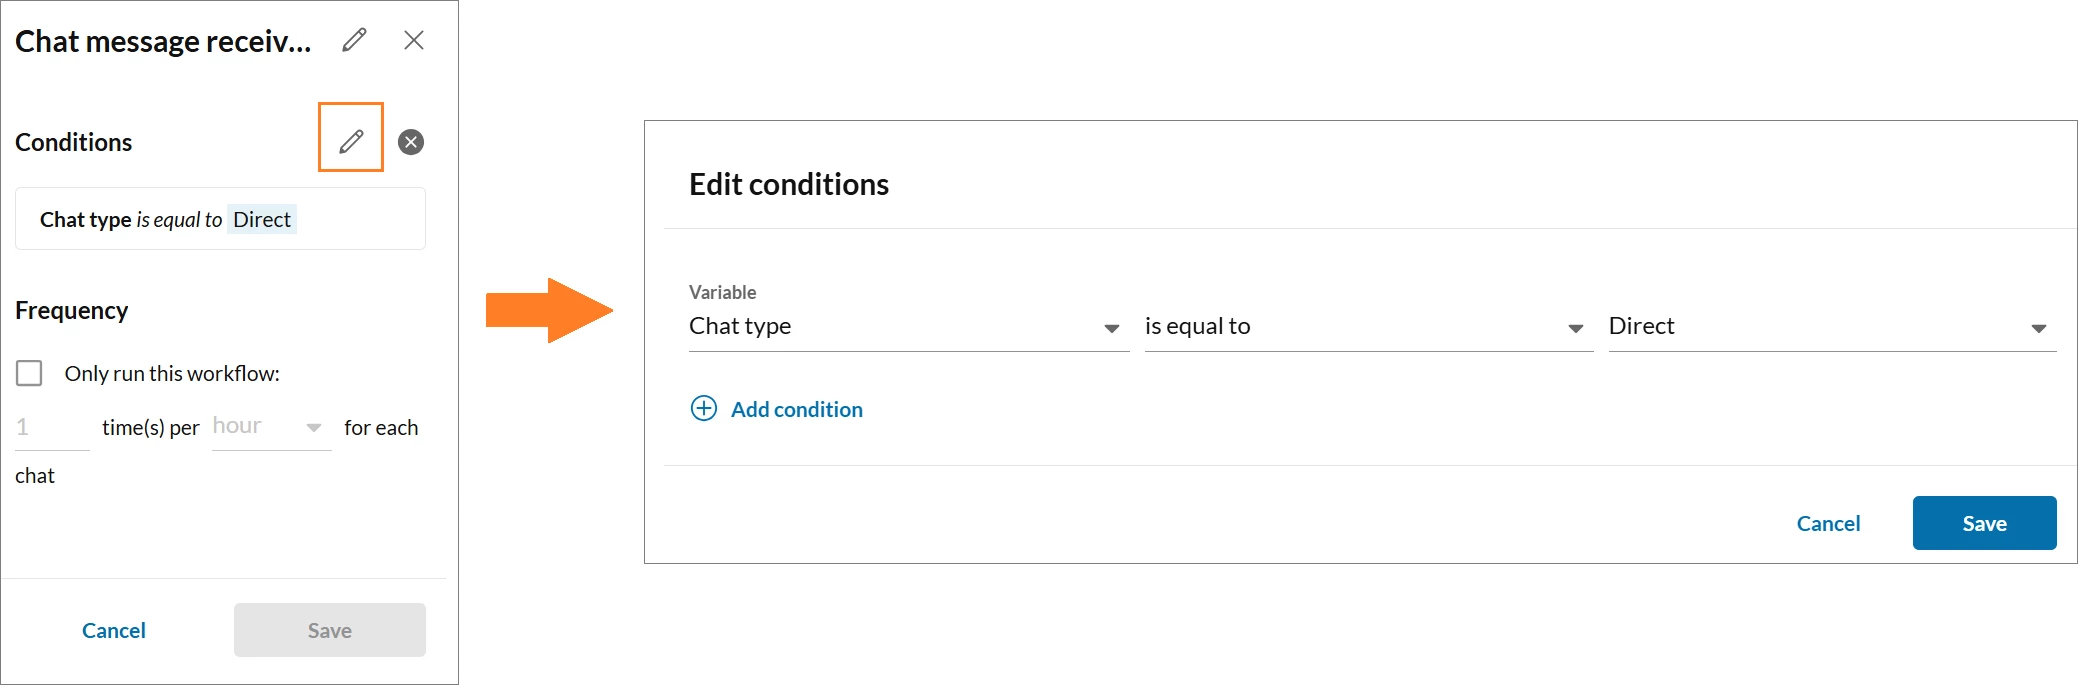
- Set a Condition. Since we only want to automatically reply to direct messages:
- Choose Chat Type, then is equal to, then choose direct.
- Click Save. This further set the criteria for the workflow, allowing it to ONLY trigger when it’s a direct message.
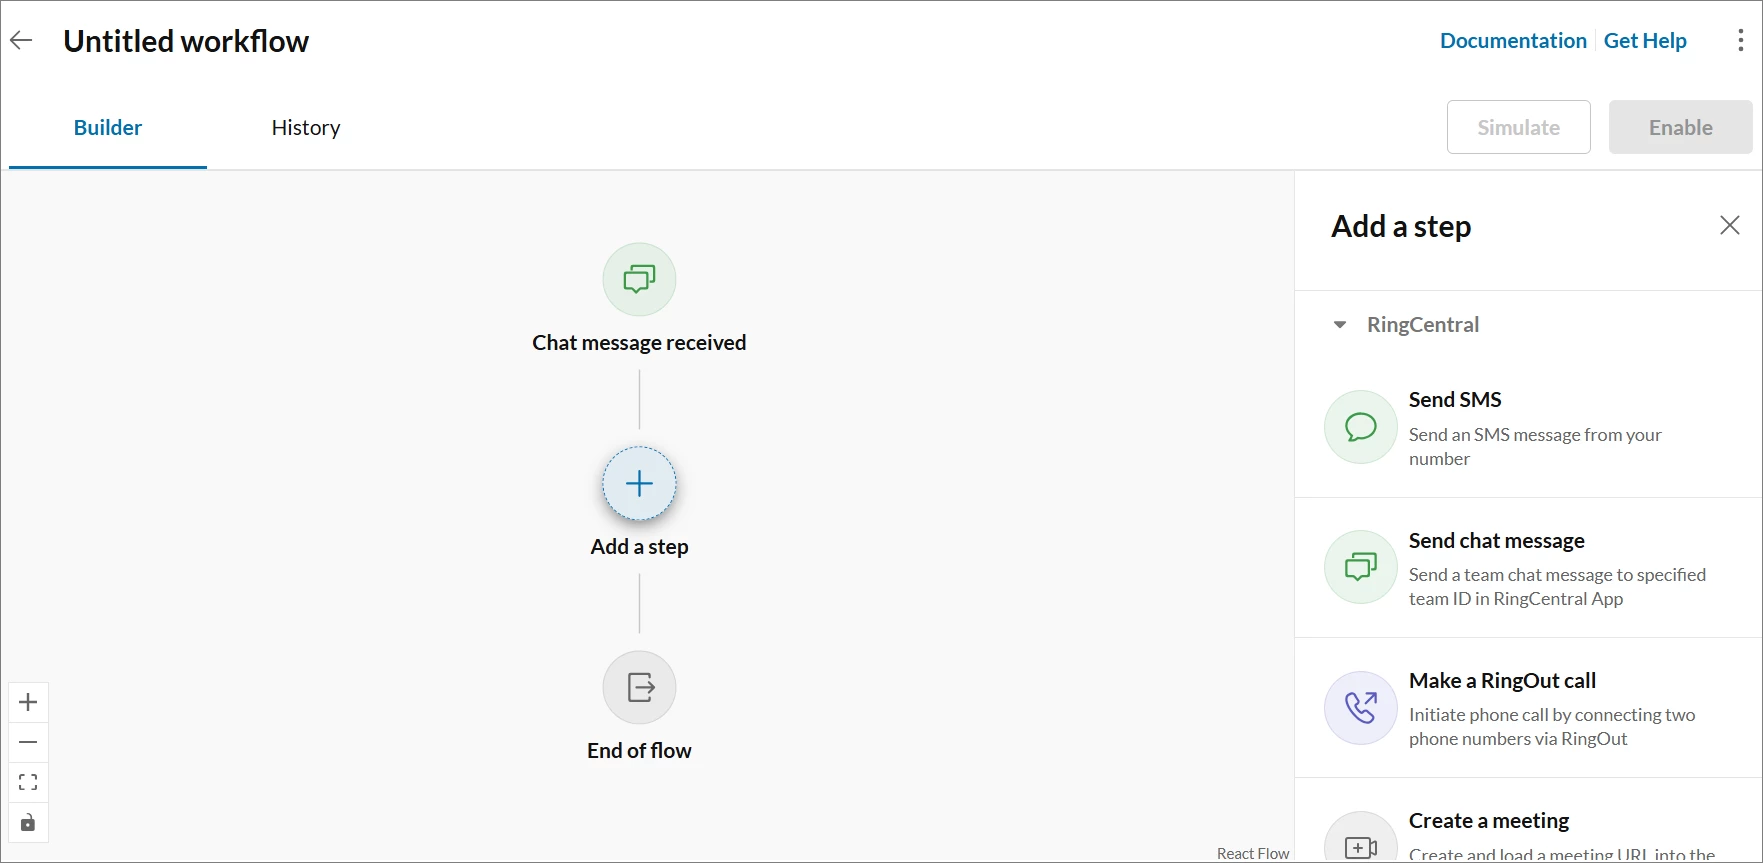
- Add an Action. Now that we’ve set the criteria of when the workflow will trigger, we need to define what the workflow will do.
- Click the Add step button.
- Select Send chat message. For this scenario we would like to send an automated message whenever someone directly messages you.
- Configure the action: Enter a message you want to send as your auto-reply. You can use dynamic fields to include information from the original message, like the sender’s name. Or send a message to your personal chat.
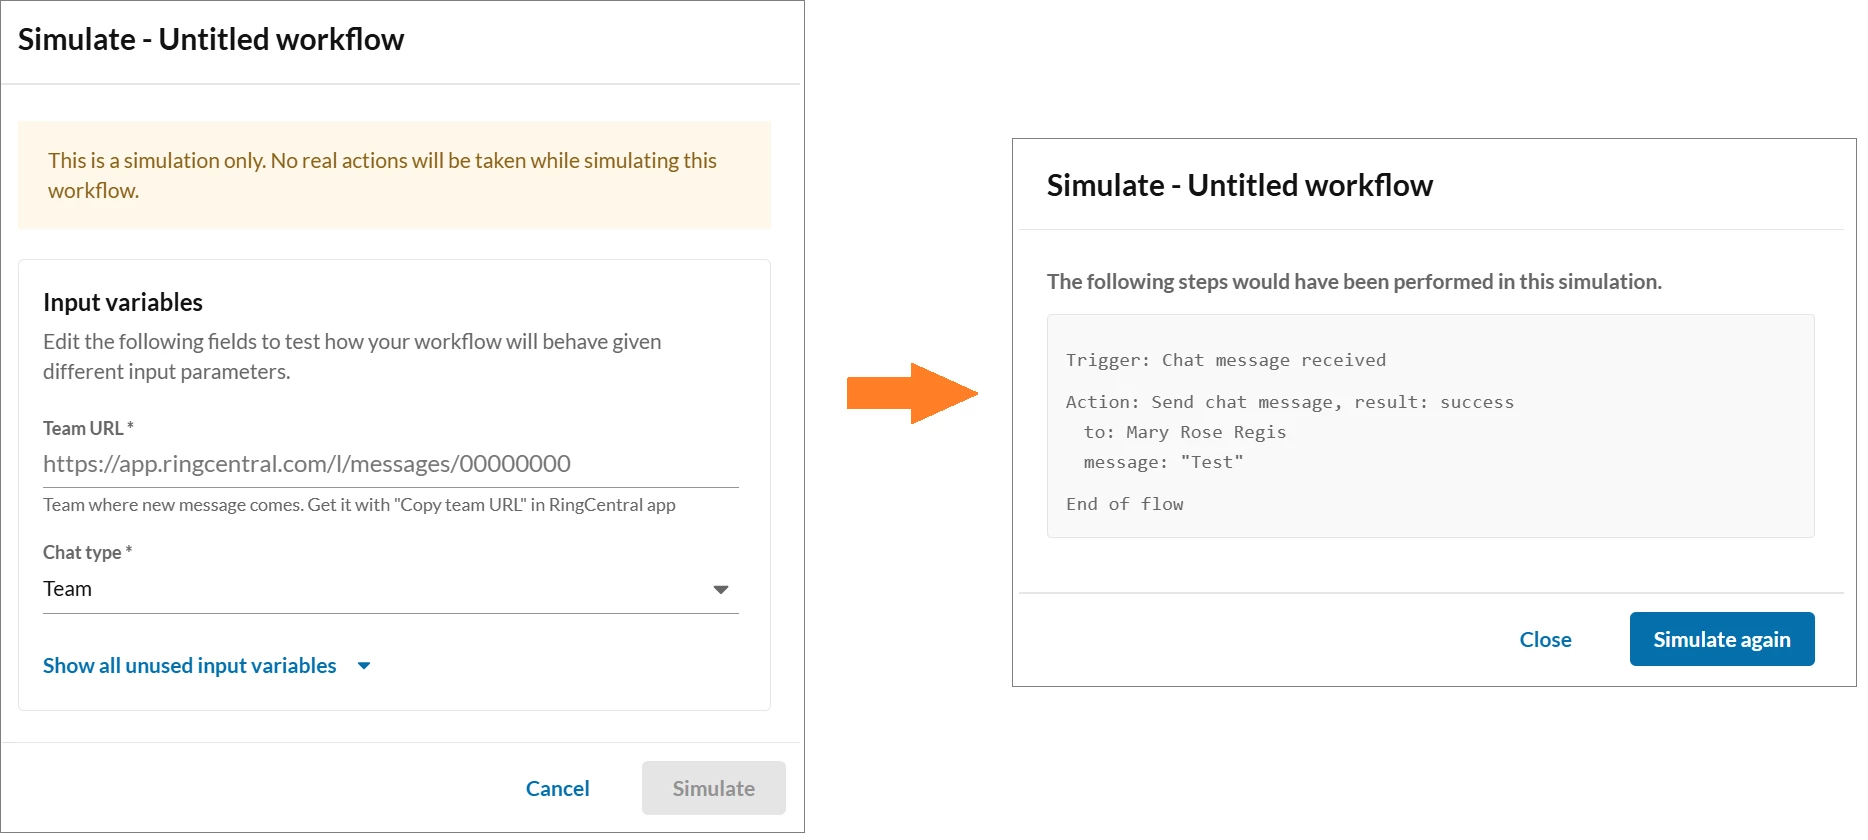
- Before you publish or enable your workflow, you can test it to make sure that it works as expected.
- Click the Simulate button. A simulation will run, and the results will be displayed in a summary box, showing you exactly how the workflow would behave in a real-world scenario.
- Click the Simulate button. A simulation will run, and the results will be displayed in a summary box, showing you exactly how the workflow would behave in a real-world scenario.
Now you have a fully functional, simple workflow! This example is just a sample autoreply that will help you automate tasks within the RingCentral app.
| Pro tip: While the example above uses a condition within the trigger, you can also add more complex logic with Condition and Branch steps.
|
There’s a lot of automation that you can try within the RingCentral Workflow builder that will make your day easier. You can also use available templates and recipes created by our developers that will automate tasks for you with just a few clicks.
Ready to start building? What's the first task you'll automate with the Workflow Builder?