Try this:
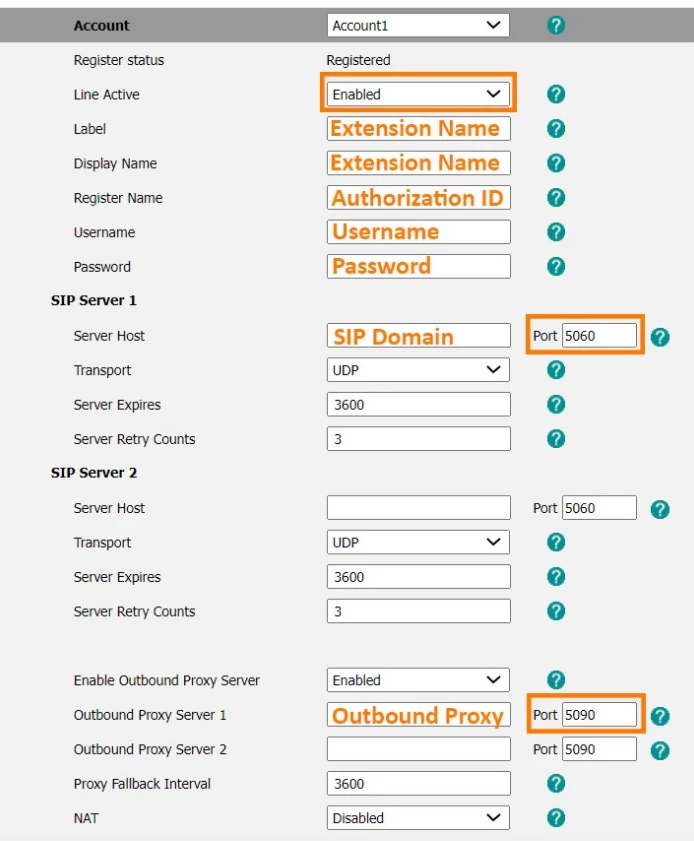
Manually provision 2 accounts on the Yealink phone. You can export the SIP details from the RingCentral admin portal. Then refer to pic below to perform manual provisioning.

Notice at the top it says “Account1”. Switch to Account2 and repeat the provisioning for the 2nd account.
Once done assign DSS Keys as desired via Yealink GUI.
Pre-requisite:
you need 2 RingEX licenses assigned to the user ext. Each license has its own set of SIP credentials. You won’t be able to achieve what you want if you only have one RingEX license + 1 ALN (additional local number).
Your phone most likely is set up via auto-provisioning currently. If you decide to try this, I recommend to first delete the MAC from the admin portal and the Server URL from the Yealink > Settings > Auto-provisioning > Server URL.
If you change your mind you’d always be able to add the MAC back to the admin portal and the Server URL to the phone, so I don’t see any risk in giving it a shot.
Feel free to ask here or dm me if you need more details on any of the steps.
Also when I use the PC app, I want to be able to select that 2nd line from which to dial out from. Currently it’s not an option.
You can change the caller ID from the keypad as shown in
https://support.ringcentral.com/article-v2/setting-up-caller-id-admin-portal.html?brand=RingCentral&product=RingEX&language=en_US&pills-nav=desktop_%26_web
specifically the section Selecting your caller ID in the keypad
If you are still not able to select the 2nd line as caller ID on the app, then you need to double check how this is configured in the admin portal. You’d likely want both lines to be assigned to the same user ext.
Great suggestion, @martintsankov! Thanks so much for sharing your input. 😊